6 September, 2015
Gedimino Pilis/ Gedimino Castle
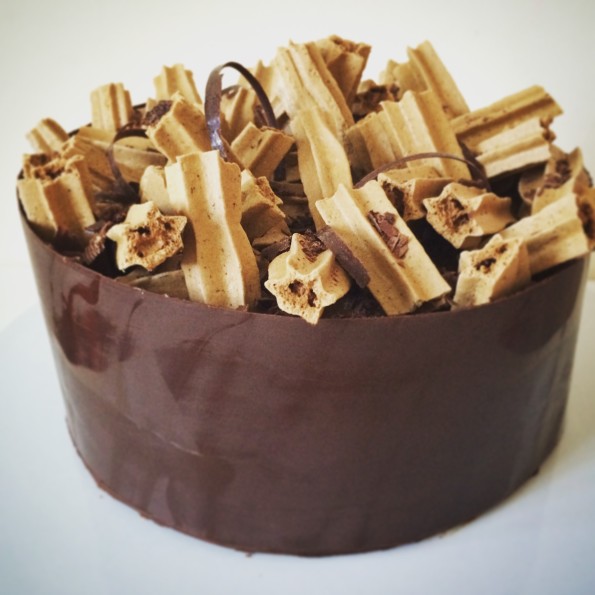
Gedimino Pilis/ Gedimino Castle Cake
(Gluten Free)
Ever since the start of my time on The Great British Bake-Off I have been reminiscing a fair amount of time of how far I’ve come since first starting to bake, as a young girl, with my family in our Kitchen back in Lithuania. I am very proud of my heritage and one of my favourite Landmarks of my Country of Birth is ‘Gedimino Pilis’ – a beautiful castle situated in Vilnius (Capital of Lithuania).
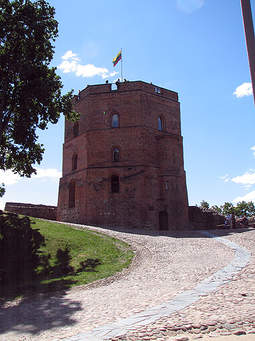
With this Landmark popping in and out of my thoughts, I had a ‘moment’ a couple of weeks ago of a Cake I wanted to create in ode to this infamous Landmark! So the ‘Gluten-Free Gerdimino Pilis Cake’ was born. I trust that the architecture of this can be roughly translated by my cake. The cake also brings back memories of a technical challenge on this year’s GBB0 – ‘Spanische Windtorte’ which the Austrian’s are very proud of. I trust that the ‘Gedimino Pilis’ will do my Country proud!
I have some fantastic Chocolate in my pantry made by Abraham Seaforth (Seaforth Chocolate Co.). This is some of the finest chocolate I have come across (and I know good chocolate when it hit my palate) in the UK – it is small batch chocolate made, in Seaforth, from imported, single origin Caribbean beans, it is true chocolate ‘gold’. Therefore, this recipe allowed for the ideal opportunity to open a few of their bars and how well it doesn’t work in this recipe, superb and once again it shows that you can’t beat good quality ingredients (from top quality sources) as it definitely makes a big difference to your final product.
This is a more advanced cake and it takes time/patience to get the right result – you have to make light fluffy mousse (not to sweet, yet not bitter), you have to bake the perfect French meringue – two ways for the shards of decoration and as disks between the mousse layers, you have to temper the chocolate and ensure you get the ‘collar’ is thin as possible to look elegant, yet thick enough not to break when applied to the cake. This cake is all about textures, indulgence and a true choco-lovers dream! I tried to keep it as ‘minimalist’ as ‘Ugne’ can possibly get – hehe!
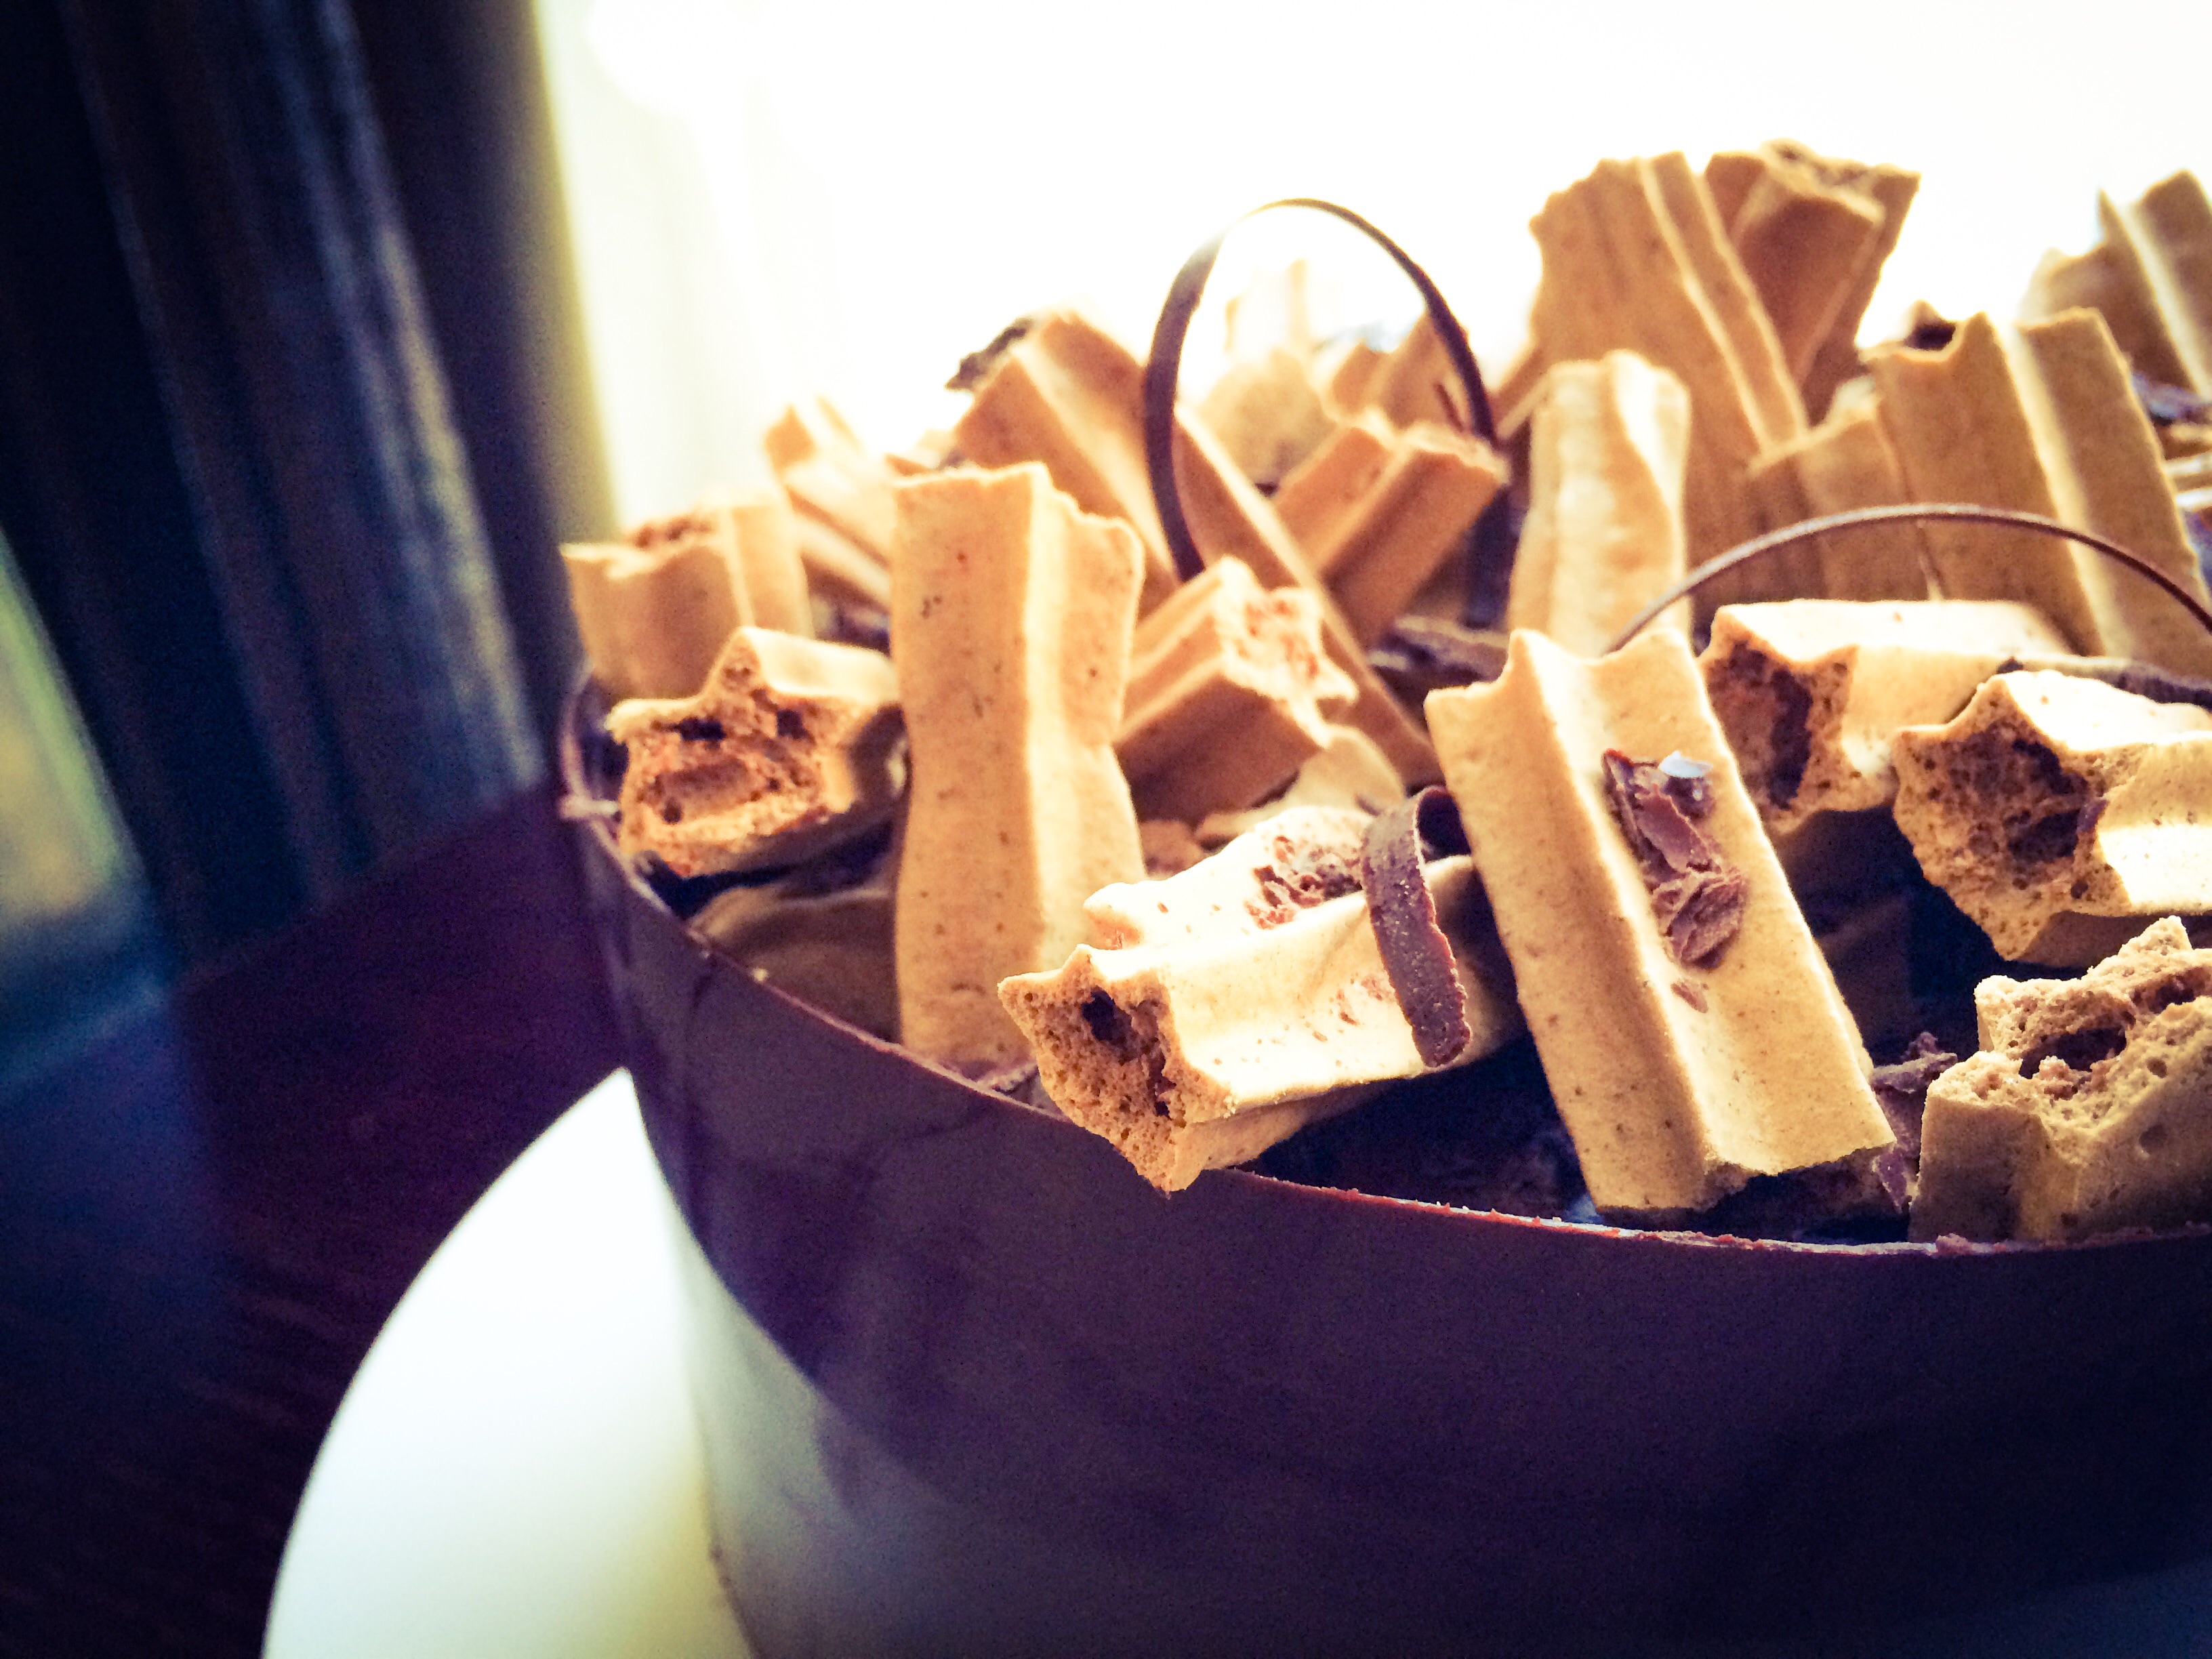
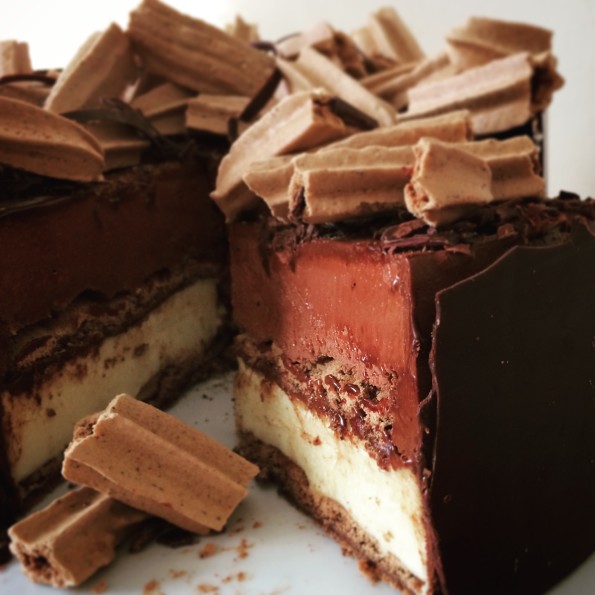
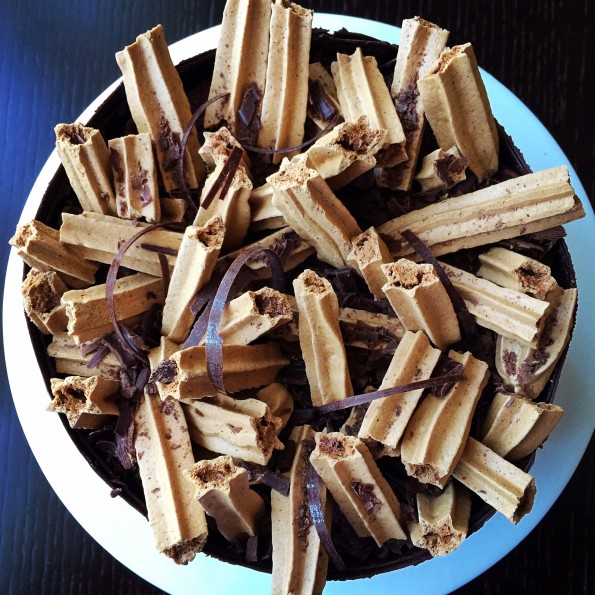
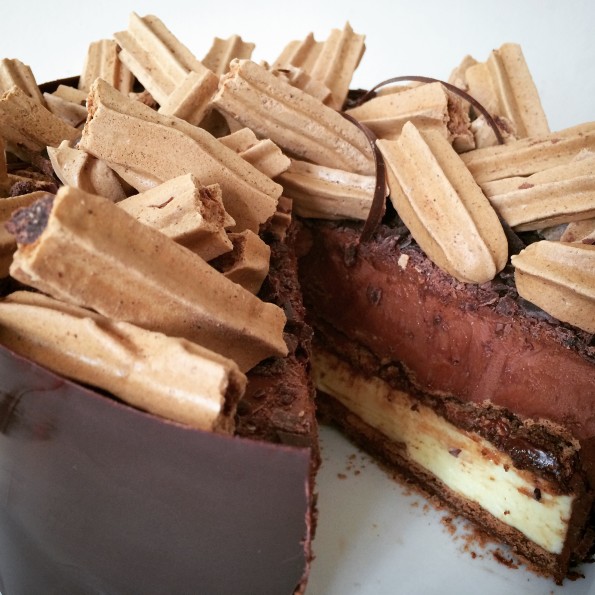
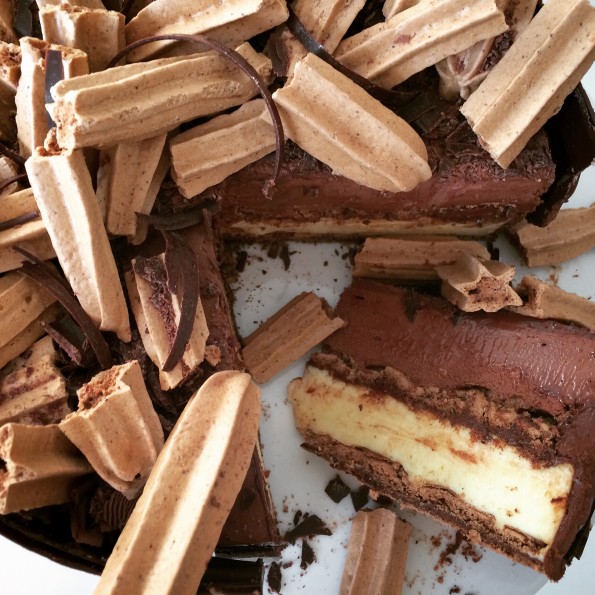
The cake is assembled from the layers of Chocolate mousse (dark and white) and Choco-Latte French Meringue (we drink a fair amount of STRONG coffee back in Lietuva so this was a homage to those ‘homely’ memories too). Finally the collar of tempered chocolate is applied and the decorative meringue and chocolate as finishing touches!
I hope you will give this a try if you feel adventurous enough and you feel that your level of skill allows for you to do so – after all, never be scared to challenge yourself as it is the only way we get better over a period of time.
I’m sure that I will further develop this recipe over time give it even more texture and aesthetic that already in place!
~~~~~~
INGREDIENTS:
Chocolate and Latte Meringue
50g Cocoa Powder
230g Icing Sugar
195g Egg Whites(room temperature)
3g Cream of Tartar
235g Caster Sugar
15g fine ground instant coffee granules
Dark Chocolate Mouse
125g Double Cream
210g Good Quality dark chocolate (I used 70% cocoa solids Seaforth chocolate) broken in to pieces
15g Unsalted Butter
190g Double cream
1 gelatine leaf (soaked in the cold water)
White Chocolate Mousse
200g White chocolate finely chopped
3 sheets leaf gelatine
75ml milk
2 tsp of liquid glucose
3 egg yolks
176ml double cream
45g icing sugar
200g Dark good quality chocolate, at leaset 70% cocoa solids for tempering to make a sleve around the cake and some other decorations if you feel adventurous.
METHOD:
Firstly prepare your French Merengue. Preheat oven to 140’C.
Sift cocoa powder, fine instant coffee and icing sugar together. In an electric mixer, whisk the egg whites with the cream of tartar and gradually add in the caster sugar one third at a time. Continue
whisking to enable the sugar to dissolve then remove from the mixer. Fold through cocoa, coffee
and icing sugar mixture until combined.
On a flat baking tray, place parchment paper and draw 2 x 19cm/8’’ diameter round templates and line with Silpat® mats on top. Using a 10mm piping tube, pipe 2 discs using the templates (bare in mind that meringue will expand little bit when baking, so leave a gap between them when piping). With the remaining meringue, pipe individual lines using an 8-10mm star tube onto a tray lined with a Silpat® mat. Bake in the oven for approximately one hour or until the meringue is crunchy. The disks may need 10 minutes extra, so take out the tray with lines out and leave the disks to bake little bit more.
Whilst meringues are baking.. You might as well tidy up your kitchen hehe…Oh and start preparing your Chocolate mousse.
Firstly prepare white chocolate mousse. Set a bowl over a saucepan which is filled to one-third with water. To the bowl add the chopped white chocolate. Soak the gelatine in cold water for a few minutes. Heat the milk in small saucepan until boiling point and then remove from the heat.
Squeeze out the water from the gelatine and add it to the milk. Stir gently until the gelatine has dissolved. Pour the hot milk over the white chocolate and gently mix with a whisk until there are no lumps and is it a smooth consistency. Let it cool down to room temperature. If you will pour too warm chocolate in to whipped cream, it will break all the air in the whip and it won’t be silky.
In another bowl add the egg yolks, liquid glucose and 2 tbsp of warm water. Mix together until combined.
Whip the cream and icing sugar in another bowl until the cream leaves ribbon trails and is rather thick in texture when you take the whisk out of the mixture. Add the egg yolk mixture to the chocolate and mix gently until combined.
Using a spatula fold in the chocolate mixture in to the whipped cream gently until fully combined.
Cut one of the meringue rings the size as your chefs ring is, I had cut it 18cm/7’In place in the bottom of the ring, pour white chocolate mousse on top and put in the fridge to set a bit. In the meantime, prepare your dark chocolate mousse.
Boil the 125g of cream, add soaked gelatine, whisk, remove from the heat and add the butter. Mix and pour over the broken cholate, whisk until combined to create the ganache. Whip the 190g of double cream to semi thick (make sure not to over whip it). The ganache should be cooled down at least to 34°C before combining it with whipped cream. Once it cooled enough, carefully fold through the chilled semi whipped cream to create mouse.
Take the cake out the fridge, place second meringue ring on the white mousse, and pour the dark chocolate mousse on top. Put the cake back in the fridge for at least an hour to set again.
When cake is set, temper your chocolate and prepare the decorations.
Chop three quarters of the chocolate on a chopping board, using a serrated knife.
Finely chop the remaining quarter or process it with the blade knife attachment of a food processor.
Place the roughly chopped chocolate in a bowl and start melting it over the bain-marie.
Check the temperature with a thermometer. When it reaches 55C-58C remove the chocolate from the bain-marie.
Set aside one-third of the melted chocolate in a bowl, in a warm place. Add the remaining finely chopped quarter of the chocolate into the remaining two-thirds of the melted chocolate, stirring constantly. Bittersweet/ dark chocolate should reach a temperature of 28C-29C
Then add the melted chocolate that you have set aside to increase the temperature. Bittersweet/ dark chocolate should reach 31C-32C Stir until the right temperature is reached.
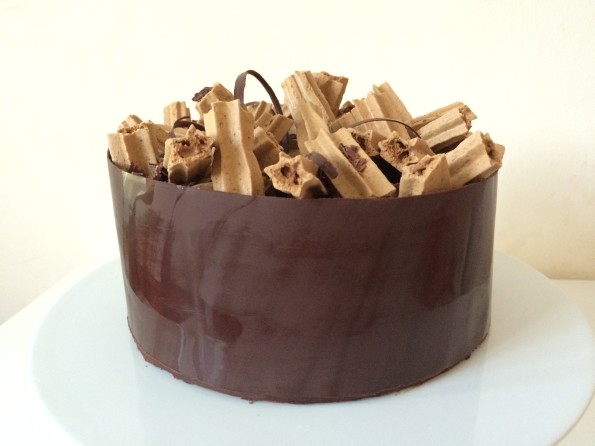
Now cut a strip of acetate the length which will equal the length of the circumference of the cake plus 2 to 3cm extra. The height of the strip has to be at least 1cm higher that the height of the cake. Place the strip on the clean work top and evenly and thinly spread the chocolate on the whole strip with a palette knife. Lift it gently and press around the cake. Wait few minutes until chocolate is set and gently peel off the strip leaving the beautifully shiny chocolate sleeve. Trim off with a sharp the extra couple of centimetres of chocolate which made the connection and voila.. Done
I have done some thin strips of chocolate for decorations same way on the acetate, which was bent when setting to make loops.
You can spread some chocolate on the glass board and scraped with knife for some decorative shavings to go on the cake.
Break the merengue strips in to pieces and arrange on top of the cake together with chocolate decorations.
This cake is truly great.
It will make a great table centrepiece for any celebration!!!
Enjoy
One thought on : 1
Another great recipe Ugnė. It looks exactly how I remember the ‘Gedimino Pilis’ to be when I saw it last month. Looks really hard to bake, but the way you put it makes me want to try it. Promise I will one day. 🙂 x